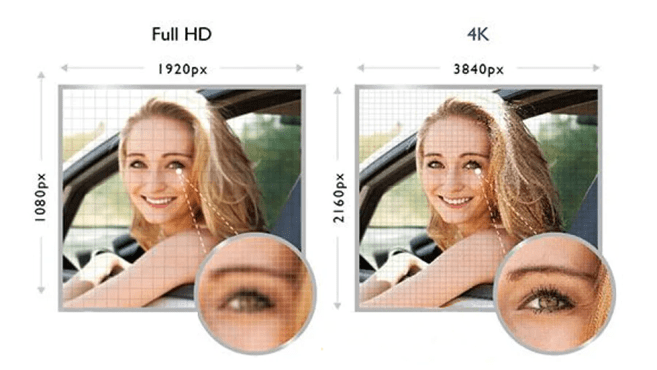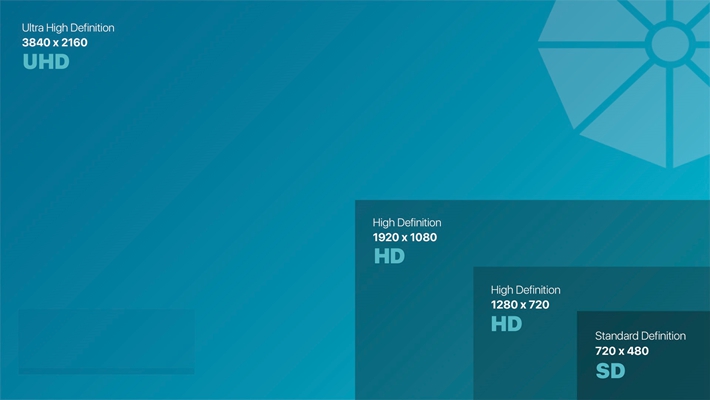
1080P/Full HD/FHD is a set of high-definition video modes characterized by 1920 pixels horizontally and 1080 pixels vertically while the “P” means progressive scan or non-interlaced. In recent times, 1080P is considered as the consumer display and broadcast standard video format while 4K fits as the professional production and cinema standard.
4K/Ultra HD/UHD is a horizontal display resolution of approximately 4000 pixels (3840 × 2160). Viewing and managing 1080P resolution videos is way better than 4K because most of the users have compatible displays and the file size is way smaller. Besides, not all devices can handle 4K resolution videos, and therefore comes the need to downscale 4K to 1080P or below.
This article takes you through several methods that you can bank on to convert/downscale 4K videos to 1080P. Of course, we have made sure to pick just the best programs too to ensure that you have smooth sailing with the task at hand. Let’s dig in!
How to Downscale 4K Videos to 1080P
In this section, we are presenting you some of the best programs, accompanied by their guides, to help you downscale 4K footage to Full HD, HD, and even lower resolutions. The featured apps are:
1. TalkHelper Video Converter (Recommended)
TalkHelper Video Converter is the best 4K to 1080P downscaler program in the market that has comprehensive support for all versions of Windows. All the popular video/audio formats and audio/video codecs are supported including the likes of AVCHD, TS, MKV, H.264/AVC, TOD/MOD, FLV, AMV, DVD, AVI, MP4, MOV, MPEG, ASF, RMVB, WMV, SWF, 3GP, M4V, RM, just to mention a few.
Besides, you are opened up to customizable presets that help downscale a 4K footage without the need to adjust lots of settings. If you have multiple 4K videos to work on, simply call the batch conversion mode to save yourself a great deal of time and effort.
TalkHelper Video Converter ensures full device compatibility of the videos you export and thanks to the top-notch algorithms, you experience high-quality output and efficient process.
![]()
Steps to convert 4K to 1080p using TalkHelper Video Converter (Recommended):
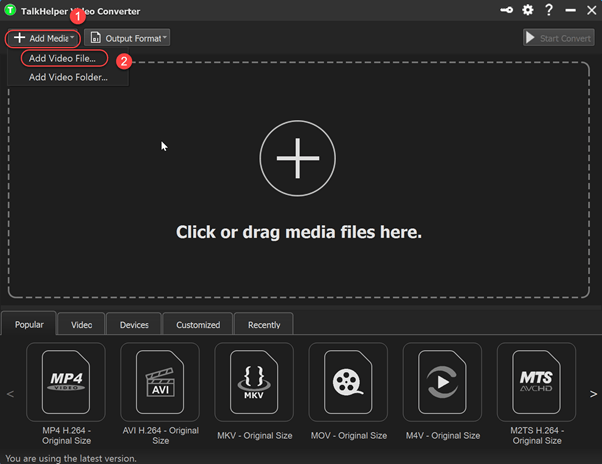
Step 1: Start TalkHelper Video Converter, expand the “Add media” drop-down menu and select the “Add Video File…” option. This will take you to a file explorer dialog where you need to locate and add the source 4K video file.
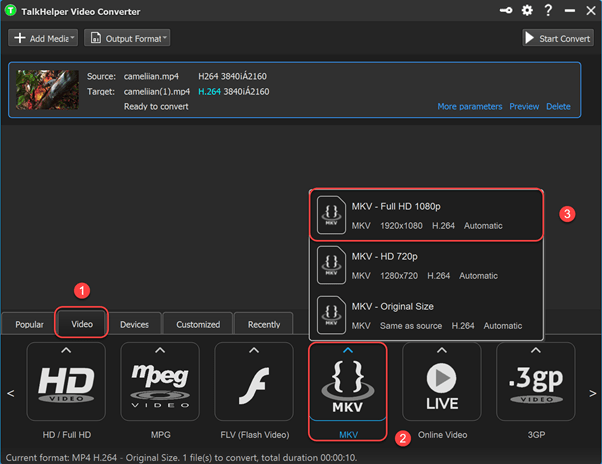
Step 2: Pick your preferred output format together with the accompanying 1080P resolution. To do that, head over to the panel at the bottom, click on the “Video” tab, scroll through the available formats till you arrive at the one you desire, and finally pick the sub-format that has “Full HD 1080p”.
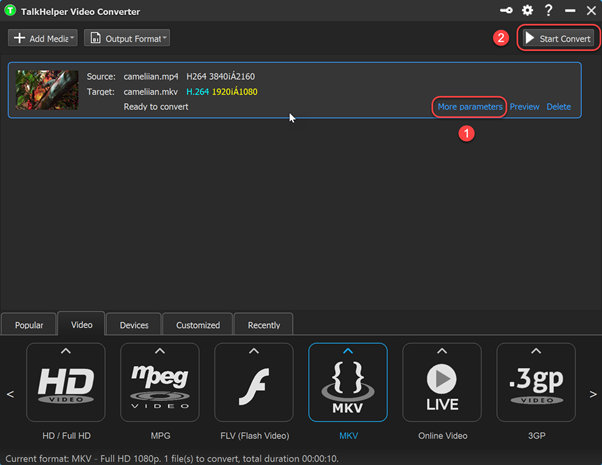
Step 3: Adjust some extra output parameters by clicking on the “More parameters” option after which you just need to hit the “Start Convert” button to begin downscaling 4K to 1080P resolution.
2. VLC Media Player
VLC Media Player is the most fully-fledged and practical media player that also happens to deliver video converting capabilities under the hood. It has comprehensive support for most of the codecs including MPEG-2, MPEG-4, H.264, MKV, WebM, WMV, MP3, among others.
Better yet, it is free, open-source and works on all the popular platforms (Windows, MacOS, Linux, iOS, Unix, Android). There are no limitations whatsoever and your downscaled video will not have any intrusive watermark.
Besides, the available preset profiles let you upscale or downscale videos while adjusting very little to no settings. If you prefer, you can preview the conversion live as it happens.
![]()
Steps to downscale 4K video to 1080p using VLC Media Player:
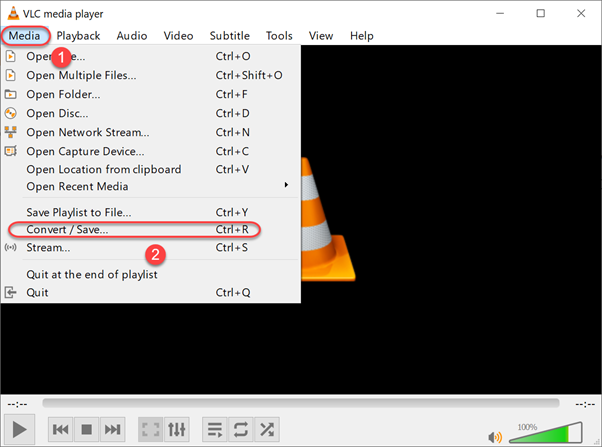
Step 1: Run VLC Media Player and from the “Media” menu, select the “Convert/Save…” option or simple use the Ctrl+R hotkey for convenience.
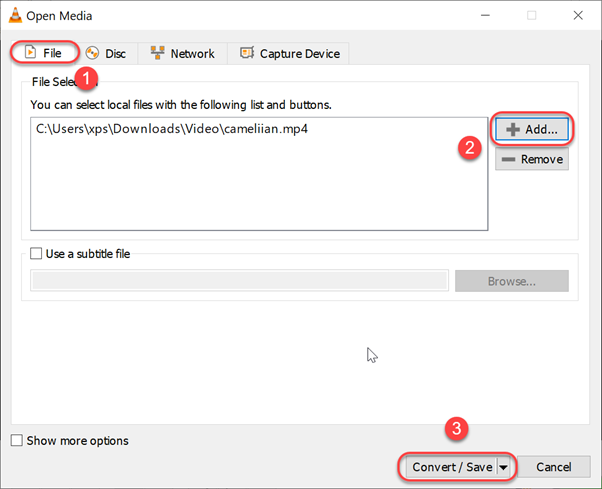
Step 2: Click on the “File” tab, hit the “Add…” button to import the 4K video to downscale and then click o the “Convert/Save” button at the bottom.
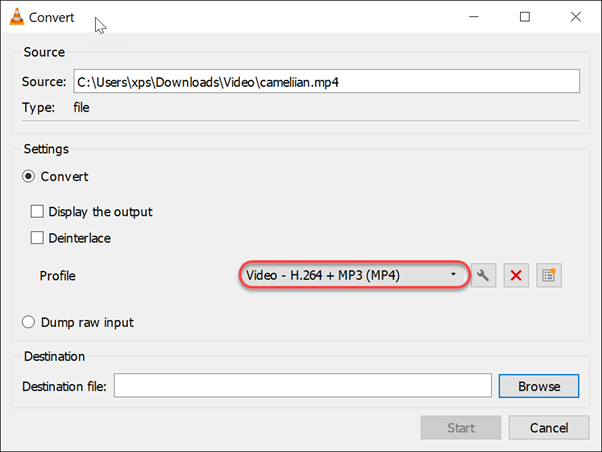
Step 3: From the “Profile” drop-down list, choose your preferred output format.
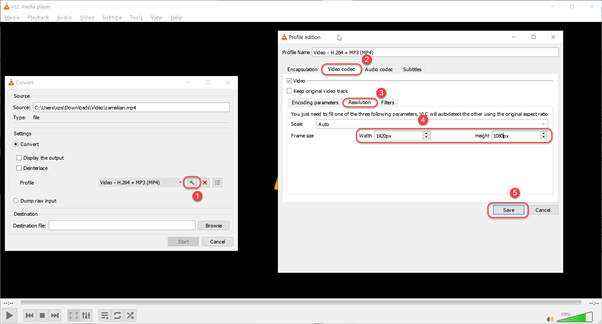
Step 4: Time to downscale 4K to 1080P. To achieve this, click on the wrench icon next to the profile you selected to open the “Profile edition” dialog. Head over to the “Video codec” tab, then “Resolution”, after which you need to enter 1920 as width and 1080 as the height. Hit the “Save” button once done.
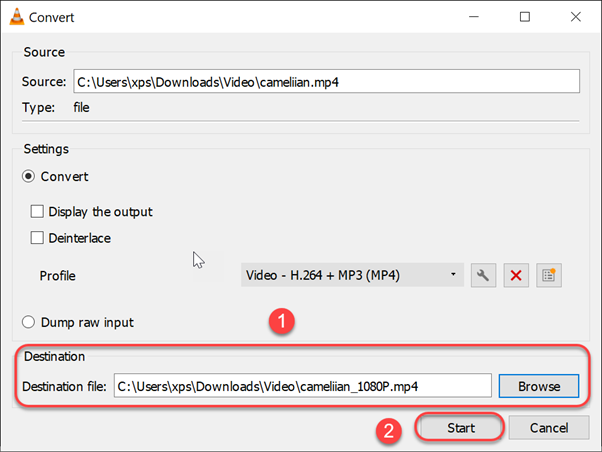
Step 5: Choose your preferred destination and filename for the downscaled video and then hit the “Start” button to commence the downscale task.
3. Adobe Premiere Pro
Adobe Premiere Pro is the industry-leading video converter and editor for social, TV, and film content. You will get to downscale any UHD 4K footage to 1080P resolution suitable for playable on most of the devices.
Even better, you are presented with video editing options that let you tweak 4K video in any format/camera/platform, in addition to native file support and lightweight proxy workflows.
Premiere Pro features an Auto Reframe tool that optimizes the FHD you export so that all the important content remains in frame even after the downscale. To further enhance the output video, you can trim, add animation/video effects, besides audio editing and the addition of sound effects where necessary. Just as the downscaling process is fluid, the same will apply when upscaling videos.
![]()
Steps to convert 4K to Full HD 1080p using Adobe Premiere Pro:
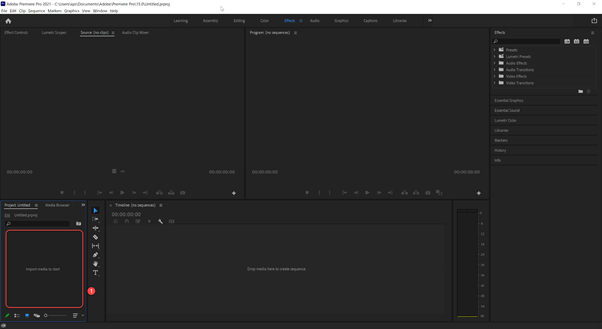
Step 1: Launch Premiere Pro, create a project, and then import the 4K footage you want downscaled. Double-click on the “Import media to start” panel to open the necessary dialog box for browsing and adding media files.
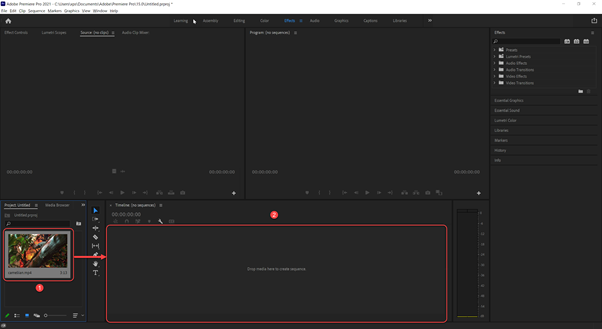
Step 2: Create a sequence. Simply drag and drop the imported video file into the “Drag media here to create sequence” panel.
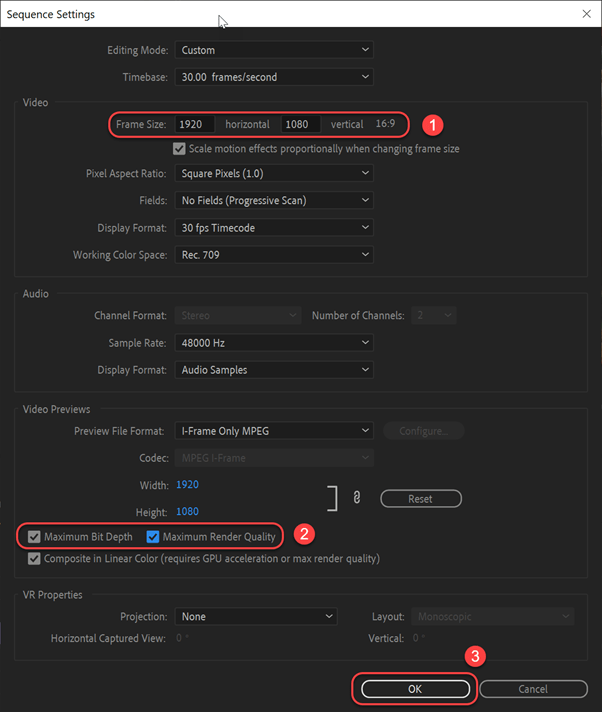
Step 3: Adjust the sequence setting to apply the downscale parameters. To open the required window, navigate to the “Sequence” file menu and then click on the “Sequence Settings…” option.
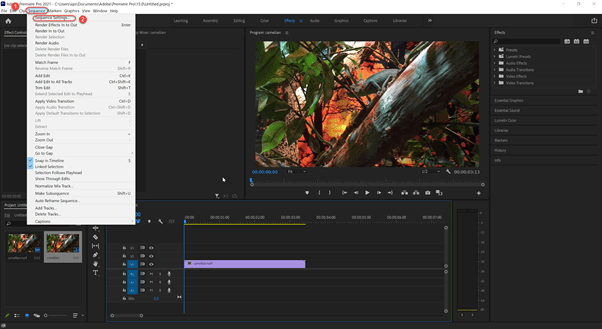
In the pop-up window, input 1920 and 1080 as the horizontal and vertical “Frame Sizes” respectively. Enable the “Maximum Bit Depth” and “Maximum Render Quality” for the best results and then hit the “OK” button to save the changes.
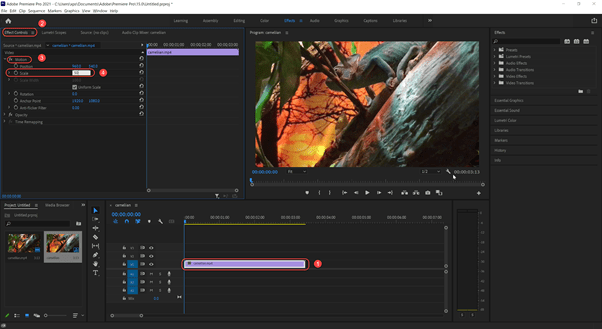
Step 4: After applying the changes, you will notice the video is zoomed in from the preview window. To rectify this, click on the source video in the “Sequence” panel which will activate the “Effect Controls” windows on the top left side. From there, expand “Motion” under “Video” options and head over to “Scale”. Edit the value from 100 to 50 and you will notice the video will be viewed perfectly on the preview window.
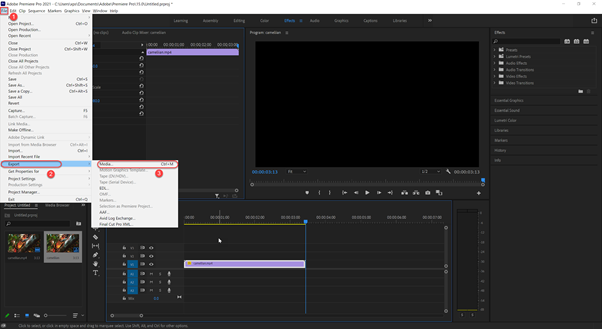
Step 5: Export the downscaled video. From the “File” menu, select the “Export” option and from the side-kick menu, choose “Media…”.
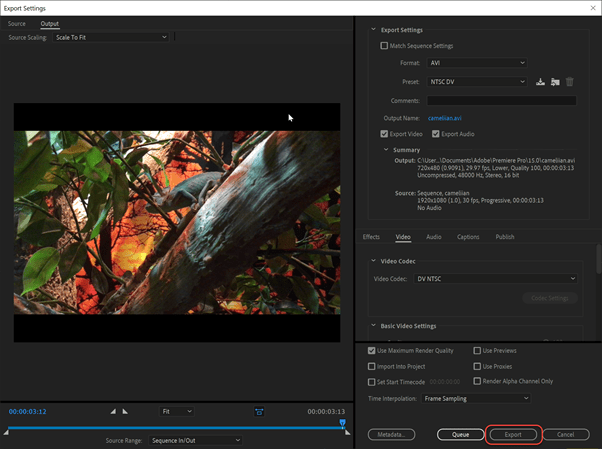
Adjust any other necessary changes in the pop-up window and when done, hit the “Export” button to render the final 1080P file.
4. VideoProc
VideoProc is a one-stop media management tool that lets you edit, resize, convert, adjust HDR/4K videos, audio, and DVDs with full hardware acceleration – Level-3 Hardware acceleration to be specific.
This means that an Ultra HD 4K video can be downscaled to a Full HD 1080P or HD 720P video with the ultimate convenience. In fact, you will enjoy speeds of up to 47X more than what similar tools have to offer.
Besides, you have some simple video editing options to help cut, merge, crop, add effects/subtitles, and rotate the 4K video to fit your preferences in the 1080P resolution video you export.
Better yet, you get to stabilize, fix fisheye, denoise, watermark, and enhance the video during the downscale process. VideoProc will downgrade the Ultra High-Definition video at a pixel level to ensure the best quality.
![]()
Steps to downscale 4K video to 1080P using VideoProc:
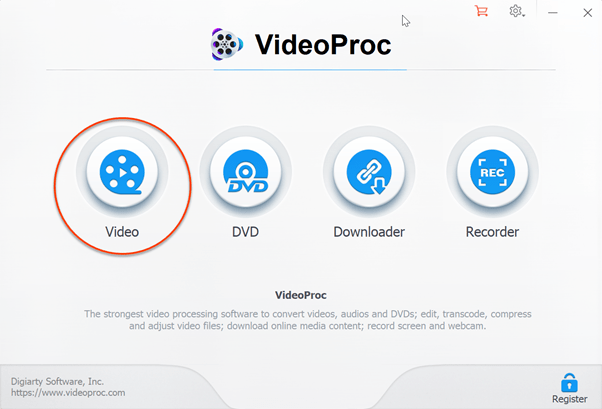
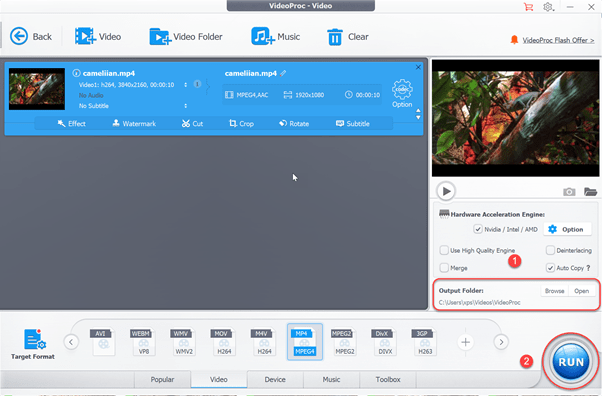
Step 1: On the VideoProc landing dashboard, click on the “Video” icon to open the video conversion interface.
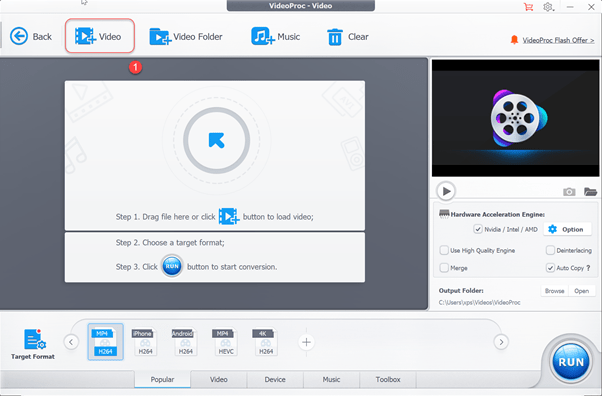
Step 2: Add a 4K video to downscale to 1080P. Simply click on the “Video” icon at the top to open a file browser dialog box. With it, navigate to the location of the source 4K file and add it.
Step 3: Choose your preferred output format. From the “Target Format” panel at the bottom, click on the “Video” tab, and then scroll through the available format till you find your preferred one.
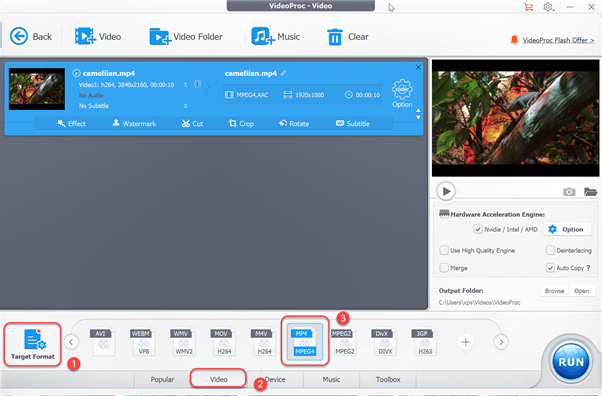
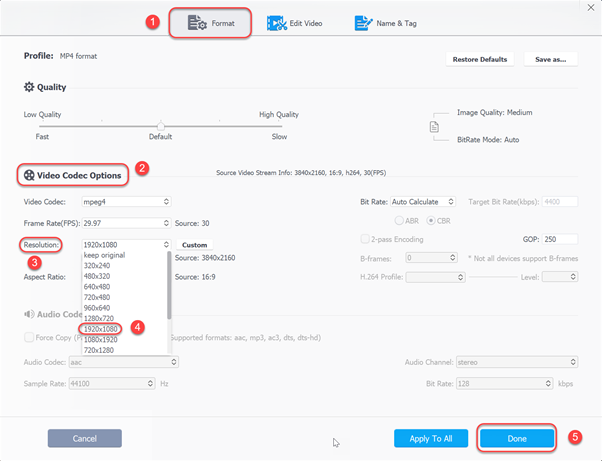
Step 4: Set the output resolution to 1080P for the selected codec. First, click on the codec “Option” button shown below.
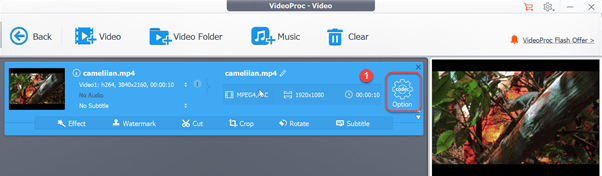
This will open the window shown below where you can adjust a ton of parameters. Since we are after the 1080P resolution, ensure that the “Format” tab is selected, head over to the “VIdeo Codec Options” section, and from the “Resolution:” drop-down menu, select the “1920 x 1080” option. Hit the “Done” button to save the changes.
Step 5: Choose your preferred output folder and finally hit the “RUN” button to start the downscaling process.
5. HandBrake
HandBrake is a comprehensive 4K to 1080P converter that couples intuitive features with the ultimate flexibility to deliver an impressive performance. It is free, open-source, and works on all the popular platforms (Windows, Mac, and Linux).
HandBrake features built-in device presets with basic and advanced tweaks to help improve the encoding process even further.
Bsides, you get to implement some of the best video/audio encoders like H.265, H.264, MPEG-4, AAC, MP3, AC3, among others to downscale 4K to 1080P with quality retention. If you are looking to downscale multiple 4K video files into 1080P equivalent, the batch convert feature is at your disposal.
![]()
Steps to change convert 4K video to 1080p using Handbrake:
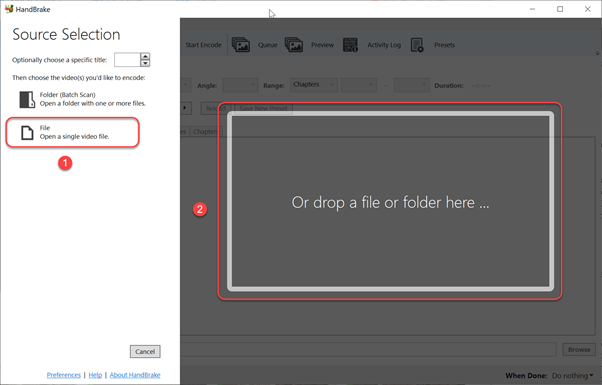
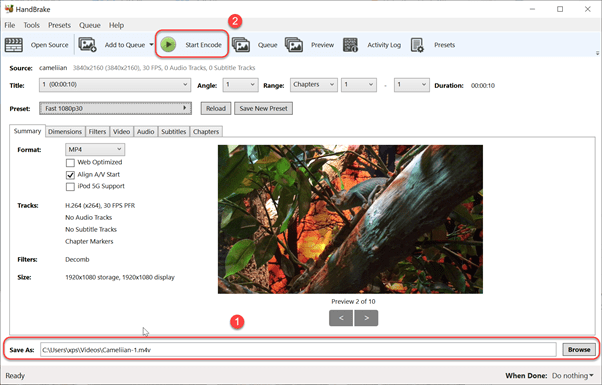
Step 1: After launching HandBrake, import the source 4K video by clicking on the “File” icon labeled 1 or simple drop of a file in the area labeled 2.
Step 2: Pick your preferred “Preset” from the drop-down menu and then choose your preferred output “Format”.
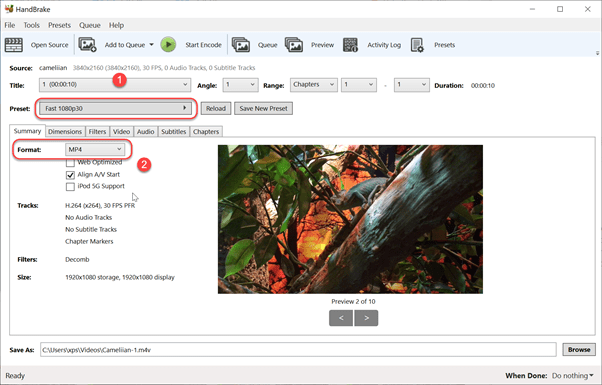
Step 3: Choose a saving directory of choice at the “Save As:” option and finally click on the “Start Encode” icon to start the downscale process.
![]()
Conclusion
If you are looking for ways to conveniently downscale 4K to 1080P, the tutorials in this how-to article have got you covered. The best thing is that these methods are very much user-friendly, even for first-timers, and are guaranteed to help you deliver exemplary results. All you need now is to pick the tool that fits your needs and get started.