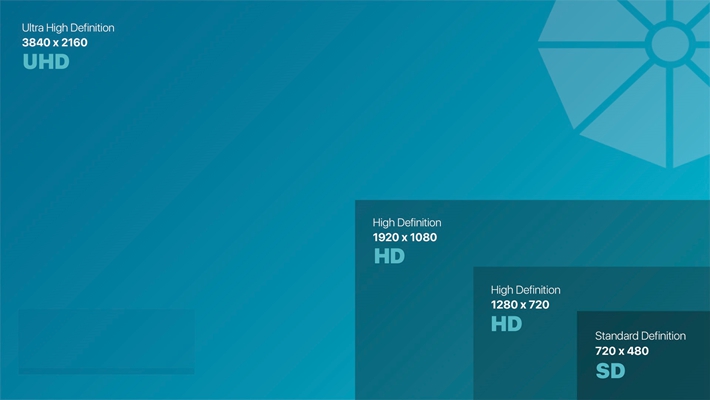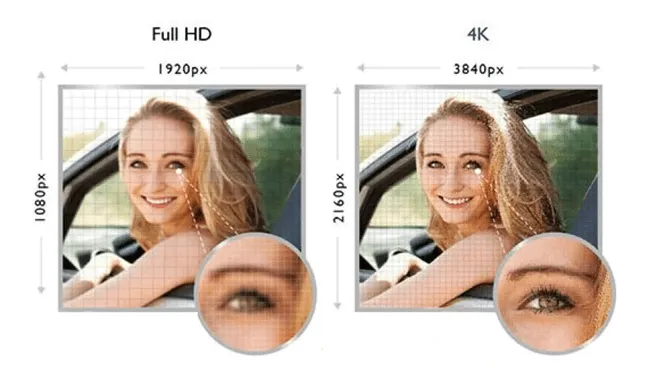
4K is an Ultra High Definition video format characterized by a resolution of 3840 x 2160 pixels at a 16:9 aspect ratio. It offers up to 4 times the quality of 1080P or Full HD video. The advantages of 4K resolution are that it brings extra fine details, can be scaled down to regular HD formats conveniently, and a viewer can sit close to a large 4K display and still enjoy intricately clear pictures.
While 4K is more of a production-level resolution, 1080P (sitting at 1920 x 1080 pixels) has become the standard format. Of course, the 4K resolution has been gaining traction, and considering that most videos are at 1080P, the need to upscale the videos to 4K UHD quality is necessary.
This article aims at providing you with the tools and specific ways to upscale Full HD videos (1080p) to Ultra HD (4K) equivalent in a smooth sail. Only the best 1080P to 4K upscaler programs have been selected to ensure a reliable process.
How to Upscale 1080p Videos to 4K
Here are the various ways you can implement to transform 1080P videos into 4K footage using:
1. TalkHelper Video Converter (Recommended)
TalkHelper Video Converter always strives to give a user the best experience any time the task of upscaling 1080P to 4K comes knocking. It utilizes your computer multi-cores to realize an overly efficient process and GPU acceleration expedites the process to convert 1080P to 4K even further.
Through the use of powerful algorithms, you can rest assured of high-quality output that culminates from a lossless video conversion process. For convenience, this 1080P to 4K upscaler delivers presets that you can use to cut down on the number of settings to tinker with, making the output arrive even faster.
TalkHelper Video Converter lets you upscale videos in full format and device compatibility especially in regards to playability. Besides, the batch convert feature lets you upscale multiple Full HD into their Ultra HD equivalent, all at the same time.
![]()
Steps to upscale 1080p video to 4K using TalkHelper Video Converter:
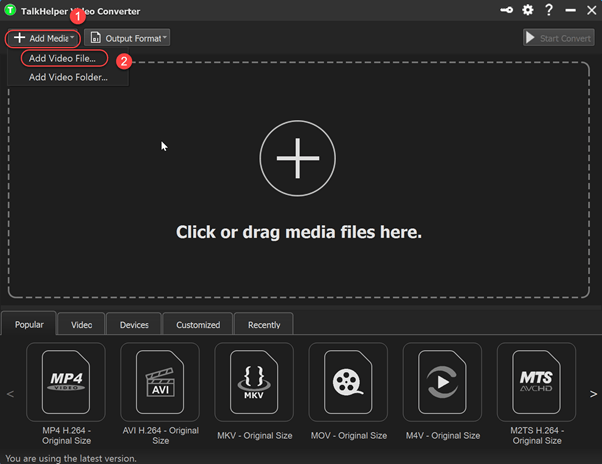
Step 1: With TalkHelper Video Converter up and running, navigate to the “Add Media” drop-down menu and select the “Add Video File…” option to open the relevant video import dialog. Browse for the source 1080P video file to add it.
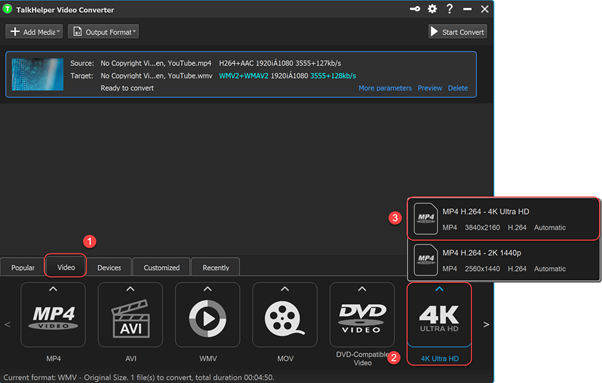
Step 2: Set 4K as the output resolution. From the panel at the bottom of the interface, head over to the “Video” tab, scroll till you get to the “4K Ultra HD” option, expand it and select the format with the “4K Ultra HD” suffix.
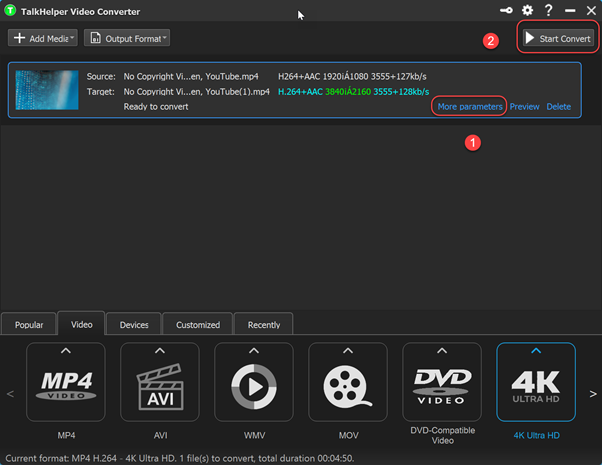
Step 3: Set the output folder, quality level, among other parameters by clicking on the “More parameters” option and once you are satisfied with everything, click on the “Start Convert” button to start the upscaling process.
2. DVDFab Enlarger AI
DVDFab Enlarger AI utilizes the Super-Resolution technology to amazingly upscale video resolutions in a way that most tools cannot rival. For instance, this video upscaler can convert 480P SD to 1080P Full HD, or 1080P to 4K UHD without breaking a sweat.
In fact, you will love the fact that this app can upscale video files, at a pixel level, by up to 300%, retain great levels of details and exponentially improve the overall video sharpness and quality.
Therefore, you can upscale even old DVD collections or other low-res videos and breathe new life into them. Not forgetting that you are also opened to a DVD/Blu-ray ripper that automatically upscales the resolution for you to 720P, 1080P, or even 4K level. To save both time and effort, the batch convert feature is at your disposal.
![]()
Steps to convert 1080p video to 4K using DVDFab Enlarger AI:
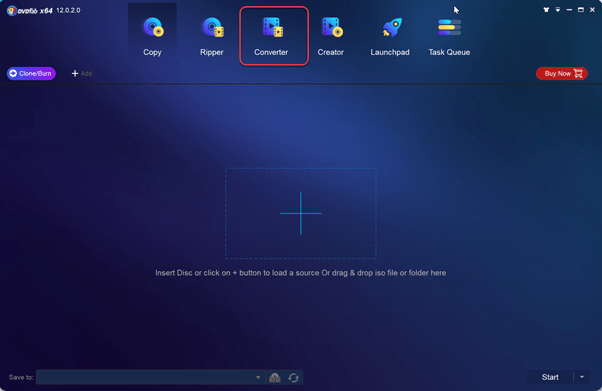
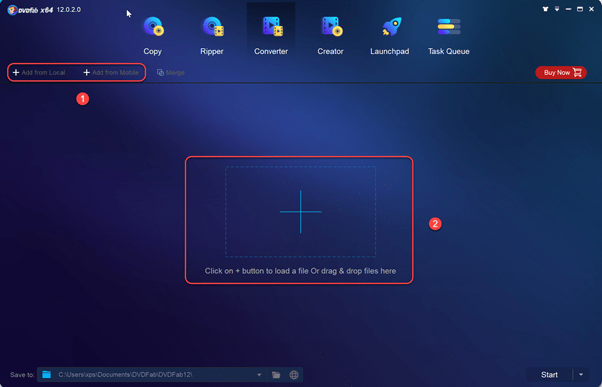
Step 1: Run DVDFab and click on the “Converter” mode.
Step 2: Add a 1080P resolution video through the native file explorer (“Add from Local” button) method or simply drag and drop the video in the indicated area.
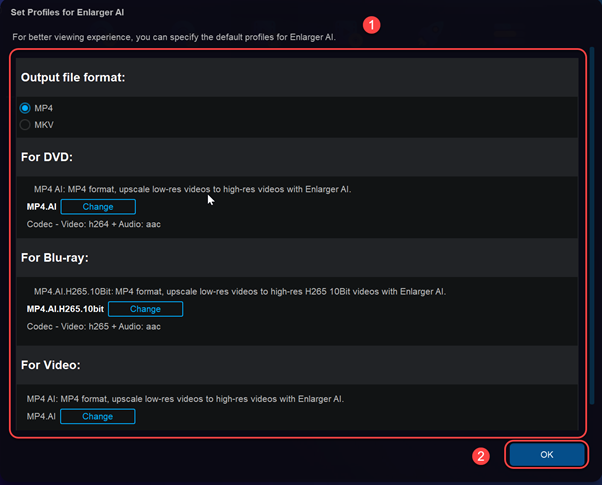
Step 3: Set Profiles for Enlarger AI. The moment you select a 1080P file to add, you will be presented with the interface below requiring you to specify some default profiles. Adjust accordingly or skip altogether and just hit the “OK” button.
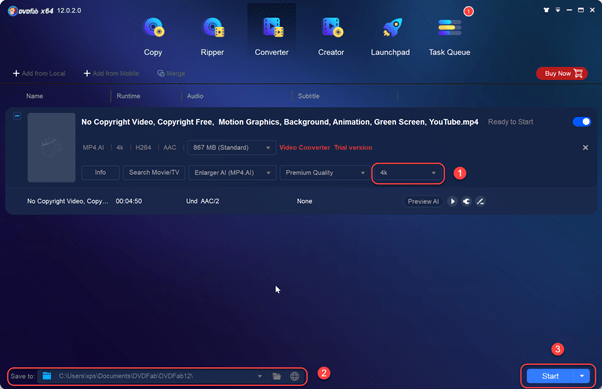
Step 4: Set 4K as the output resolution, define output parameters under the “Save to” section, and then hit the “Start” button to start the process.
3. VideoProc
VideoProc delivers a plethora of media management features and our great interest lies in its ability to resize/adjust/upscale low-resolution footage to higher resolutions. To be specific, this craft by Digiarty offers the much-coveted Level-3 GPU acceleration feature (on NVIDIA, AMD, and Intel GPUs) that boosts the conversion speeds while delivering quality-retaining output in the upscaled 4K video.
Also, it presents a video downloader for sites like Vimeo, YouTube, Dailymotion, among others, to help you grab the Full HD videos that can then be converted to Ultra HD quality.
Besides supporting the native video formats, VideoProc lets you convert 1080P DVD content into 4K quality to support larger displays capable of supporting 4K content like movie theatres. Some other handy features include video stabilization, denoising, video enhancement, video compression, watermarking, among others.
![]()
Steps to upscale Full HD video to 4K using VideoProc:
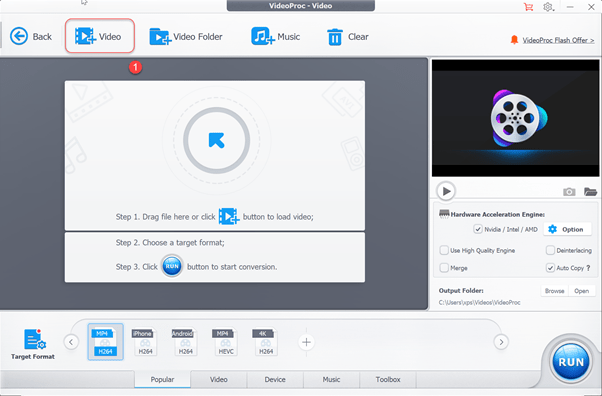
Step 1: Launch VideoProc and select the video conversion mode.
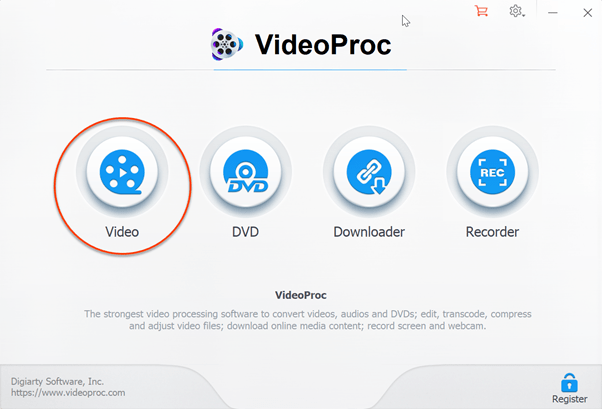
Step 2: Add a 1080P video to upscale. Click on the “Video” icon to launch a dialog box necessary for importing video files. Simply navigate to where the video is located and select it.
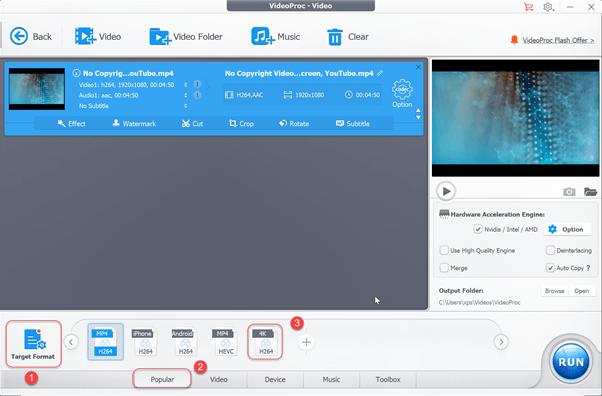
Step 3: From the “Target Format” section at the bottom, click on the “Popular” tab and select “4K” as the output resolution.
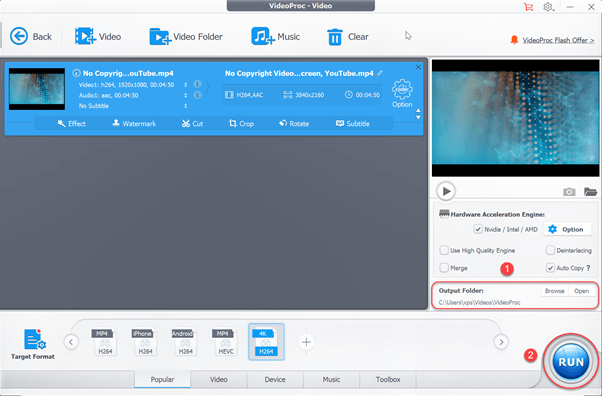
Step 4: Pick the destination folder under the “Output Folder:” section and then hit the “RUN” button to commence the upscale.
4. Adobe Premiere Pro
Adobe Premiere Pro is a top video editor and converter program that has made quite a name for itself as the best industry-standard video production app. It supports a wide array of media formats and therefore very ideal for upscaling 1080P to 4K.
Featuring the latest GPU acceleration technology, Adobe Premiere Pro speeds up the workflow and gives you faster control over parameters like the frame rate, aspect ratio, and media channels. You also get native support for various cameras like Sony, Niko, Panasonic, among others, and this means you can import 1080P content directly and be ready to upscale it within no time. Overall, this 1080P to 4K converter offers breakthrough performance and the highest quality possible at all times.
![]()
Steps to convert Full HD video to 4K using Adobe Premiere Pro:
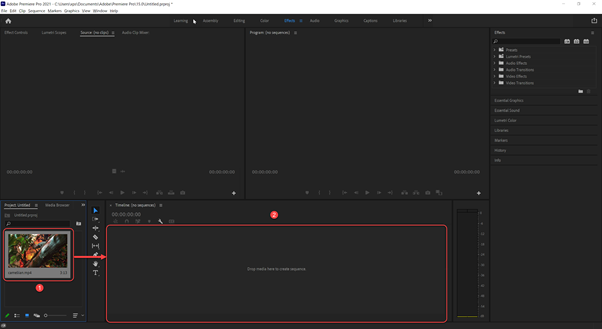
Step 1: Run Premiere Pro, create a new project and then add the 1080P video you want upscaled. Double-click on the “Import media to start” panel to open the dialog box necessary for browsing and adding media files.
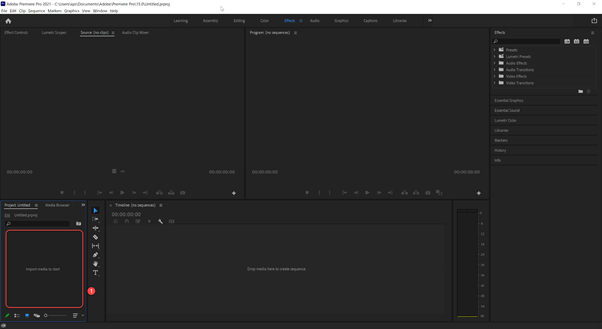
Step 2: Create a sequence. To do this, drag and drop the added video file into the “Drag media here to create sequence” panel.
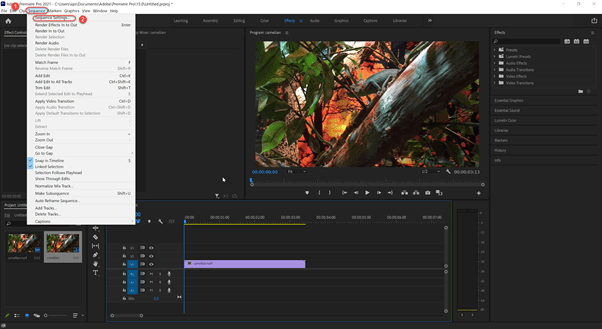
Step 3: Tweak the sequence settings to apply the 4K upscale parameters. To open the required window, head over to the “Sequence” file menu and click on the “Sequence Settings…” option.
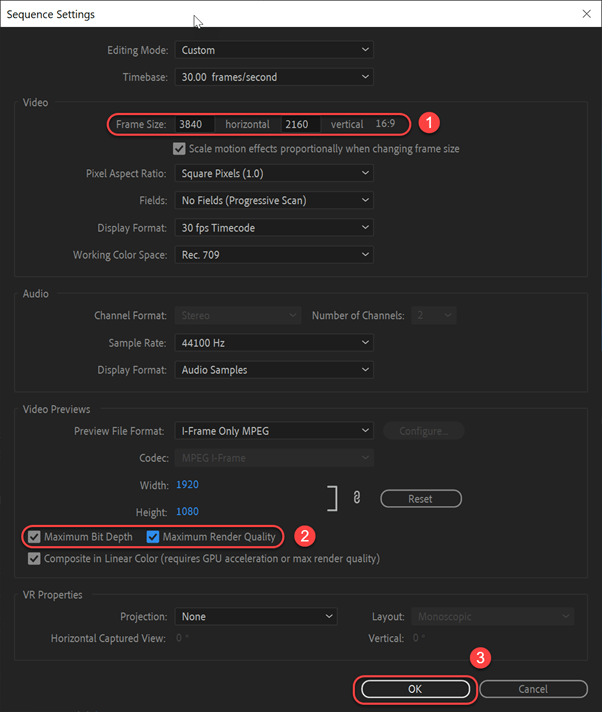
In the resulting window, input 3840 and 2160 as the horizontal and vertical “Frame Sizes” respectively. Enable the “Maximum Bit Depth” and “Maximum Render Quality” too for the best results. Click on the “OK” button to save the changes.
Step 4: After applying the changes, the video is zoomed out on the preview window by half. To make the video fill the window, click on the source video in the “Sequence” panel to activate the “Effect Controls” window on the top left side. From here, expand “Motion” under “Video” options and navigate to “Scale”. Edit the value fr0m 100 to 200 and the video will automatically fill the window.

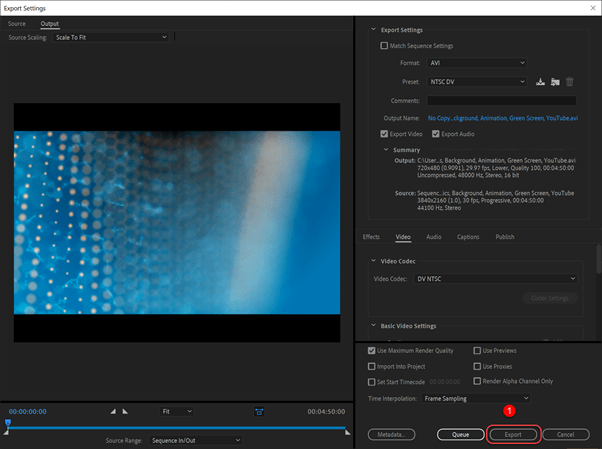
Step 5: Export the upscaled video. From the “File” menu, select the “Export” option and choose “Media…” from the side-kick menu.
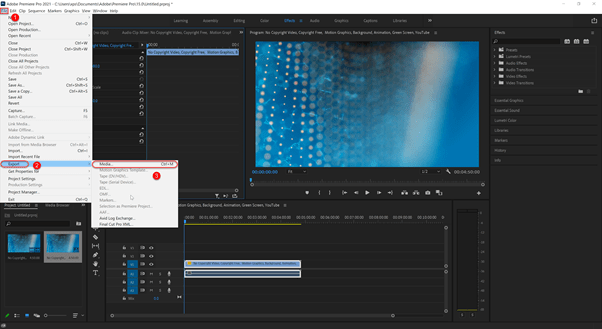
Make any other adjustment in the pop-up window before clicking on the “Export” button to render the final 4K video file.
![]()
Conclusion
When the need to upscale a 1080P resolution video to Ultra HD 4K quality comes knocking, you not only have the tools to go about that but also guides to navigate you through a successful process. These how-to guides have been simplified in a way to accommodate all users regardless of prior experience. At this juncture, pick your favorite way and upscale 1080P to 4K.