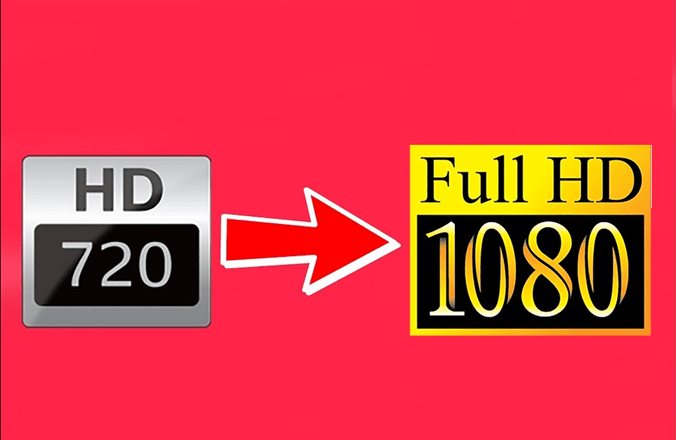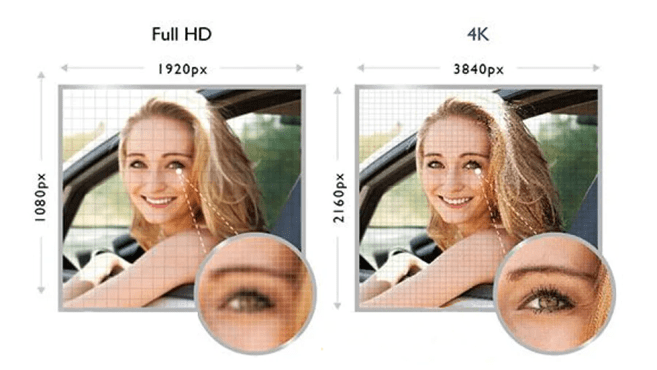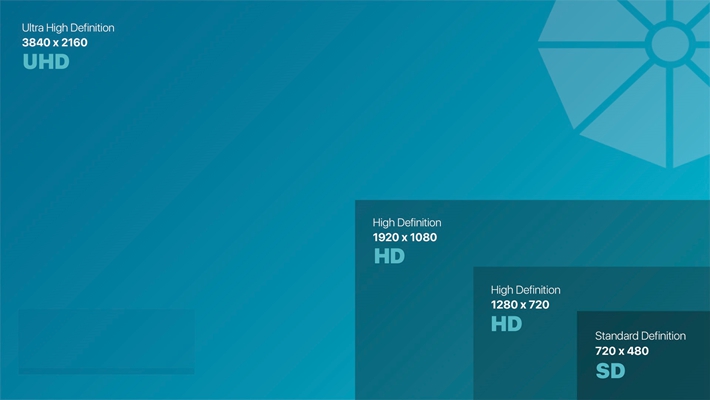
Video resolution refers to the distinct pixels in each dimension (width and height) that can be displayed and largely determines the size of the video. For instance, HD 720P (1280×720), Full HD 1080P (1920×1080), and Ultra HD 4K (3840×2160) are some of the video resolutions you may have come across or even used. In a world where there are multiple multimedia devices, with different screen sizes, there are bound to be playback and compatibility issues when a device does not support the resolution coming with the video at hand.
To bridge this gap, the need to change video resolution or aspect ratio without quality loss is realized. In that line, this article seeks to present you with the best video resolution converter software with accompanying guides to achieving the same.
The best video resolution converter lets you resize a video, increase/lower the resolution/aspect ratio, enhance/improve the video quality, and in general helps adjust videos to fit just any screen resolution.
Top 8 Great Video Resolution Converters on Windows & Mac
| Software Name | Supported OS | Offline Version | Download Link |
|---|---|---|---|
| Windows/Mac | Full Version | Free Download | |
| Windows/Mac | Free Trial | Free Download | |
| Windows/Mac | Free Demo | Free Download | |
| Windows | Full Version | Free Download | |
| Windows/Mac | Free Version | Free Download | |
| Windows/Mac | Free Version | Free Download | |
| Windows/Mac | Free Trial | Free Download | |
| Windows | Free Demo | Free Download |
How to Change Video Resolution on Windows and Mac
In this section, you will get acquainted with detailed step-by-step guides on how to use 8 of the best video resolution converter software and without further ado, let’s get started.
1. TalkHelper Video Converter (Recommended)
TalkHelper Video Converter has been at the forefront of video resolution converters, setting the pace to deliver high-quality output and efficiency for that matter. It is the all-in-one software that will not only resize a video to fit any screen but also offers the much-coveted batch convert feature for an overly efficient process thanks to multi-core processing coupled with GPU acceleration.
You will enjoy comprehensive support for popular video and audio formats including MP4, MKV, AVI, MOV, WMV, MP3, just to mention a few. Better yet, you are opened up to built-in and customizable presets that come in handy when you do not want to tinker with lots of settings and still deliver the intended output.
Through the use of top-tier algorithms that offer lossless video conversion, TalkHelper Video Converter can deliver very crisp video quality every time it is called to action. Rest assured, the range of device compatibility offered by this program is unrivaled.
![]()
Steps to change video resolution using TalkHelper Video Converter (Recommended):
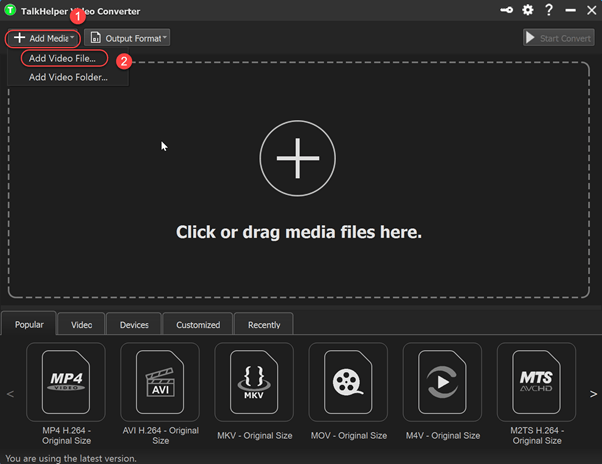
Step 1: Click on the “Add Media” button to expand it and pick either the “Add Video File…” or “Add Video Folder…” option depending on the task at hand
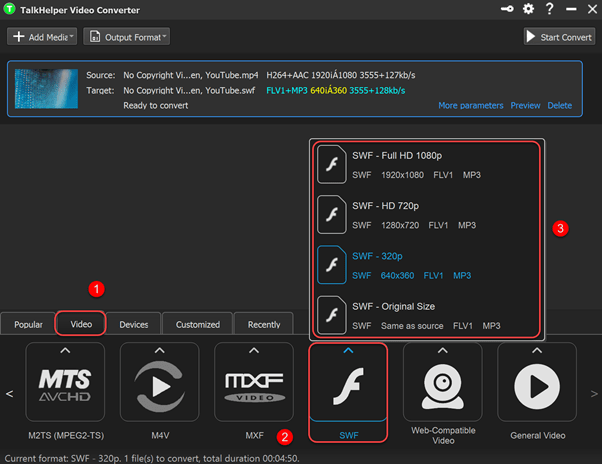
Step 2: From the panel at the bottom, navigate to the “Video” tab in readiness to select your preferred output format. Scroll through the list of output formats and select it to expand the list of sub formats based on resolution. Here, just pick the resolution you need and continue.
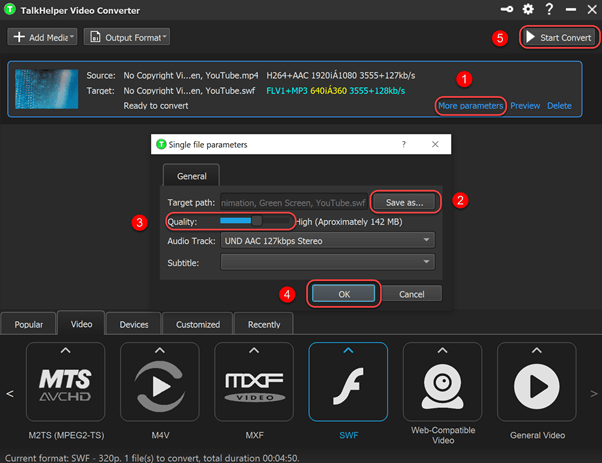
Step 3: Take even more control over the output. To do that, click on the “More parameters” option, and in the resulting pop-up, click on the “Save as…” button to define your preferred saving directory, use the “Quality” slider as necessary, and hit the “OK” button to save the adjustments. With that done, hit the “Start Convert” button to begin the resolution change process.
2. Wondershare UniConverter
Wondershare UniConverter, formerly Video Converter Ultimate, is a Windows and Mac program to help you adjust video resolution with the ultimate ease. It promises the retention of the original video/audio quality with full hardware acceleration for speeds up to 30X faster. The resizing or enhancement of multiple files saves you a lot of time and effort thanks to the batch convert feature.
For that professional-caliber output, Wondershare UniConverter offers some advanced video editing features that go a long way to make your videos stand out even after resizing or enhancing them. To complement the video resize process, you are opened up to customizable video compression options so that your videos have the right quality and size needed.
In fact, you can compress up to 8K quality videos, with a preview option, and still retain the quality. Better yet, you get a comprehensive Wondershare UniConverter Toolbox that has some extra features to make the experience even more amazing.
![]()
Steps to change video resolution using Wondershare UniConverter:
Step 1: Ensure that the “Converting” mode is selected, choose the “Video Converter” option from the left panel, and hit the document-like icon to add a file. You can choose to add a single file, a folder, or from other sources.

Step 2: With the video file added, click on the cog-like icon to open the relevant interface so that you can define the output format options. Head over to the “Video” tab and pick a general format from the left side of the interface. Choose a different resolution from the right side depending on the kind of output you need. Easy Peasy! Now hit the “Create” button to exit the interface.
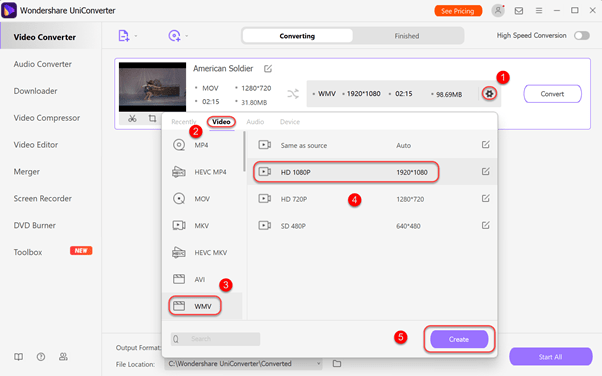
Step 3: All you need to do now is specify when the output will be saved by tinkering with the “File Location:” section before hitting the “Convert” button to complete the process.

3. Any Video Converter
Any Video Converter has to be the best video resolution converter program as it supports almost any video format out there, just as the name implies. To be specific, over 100 input and over 160 output formats are supported by this program to change video resolution conveniently.
Amazingly, you are opened up to 100% lossless quality and hardware acceleration on Nvidia, AMD, and Intel GPUs. This will translate to an even extra efficient process to increase or lower the video resolution or aspect ratio on both Windows and Mac platforms.
Besides, Any Video Converter offers a video downloader tool after which you can change/adjust the video quality, resolution, and aspect ratio, all in the same app. You are also provided with a DVD burner just in case you need to write the converted files into physical media. This video resolution converter uses the highly efficient H.265/HEVC encoding to guarantee visual quality retention, especially when used as a compressor tool.
![]()
Steps to change video resolution using Any Video Converter:
Step 1: Select the “Convert Video” tab at the top of the interface and then hit the “Add Video(s)” button to browse for the file to import. You can also drag and drop files in the indicated area besides importing videos from disks and online URLs.
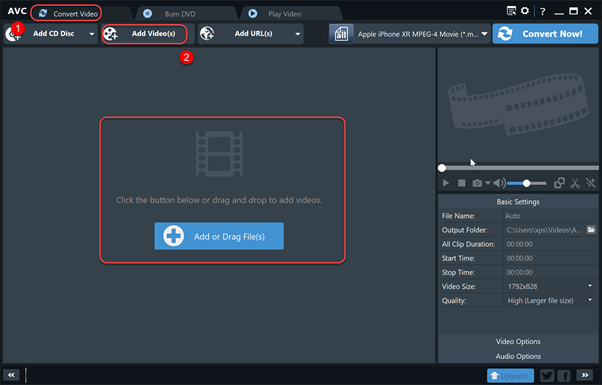
Step 2: Almost at the top right side of the interface, expand the list of output formats and then navigate to a category of choice. Depending on the category you pick, choose one of the formats on the right side side-kick menu.

Step 3: Define the output parameters. From the “Basic Settings” panel, adjust the “Output Folder:” accordingly before choosing a preset “Video Size:” to rock. To change the resolution manually, click on the cog-like button to open a minimal popup. It is here that you will define your values for the width and height before clicking on the tick icon to save the changes.
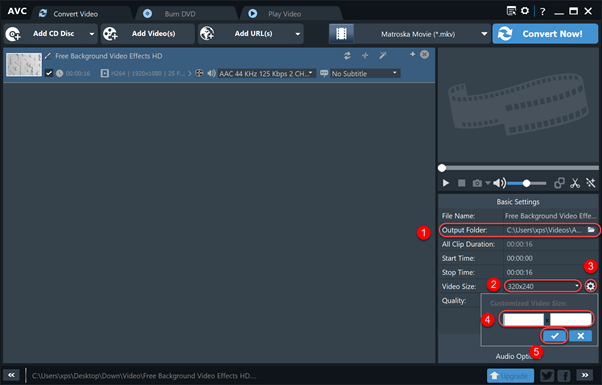
Step 4: Finally, hit the “Convert Now!” button to start the video resolution change.

4. Freemake Video Converter
Freemake Video Converter offers a free way to convert between over 500 formats and gadgets to change the video resolution, quality, or aspect ratio. To be specific, you will have formats like MP4, MP3, AVI, WMV, DVD, Blu-ray, and more as output besides devices like iPhones and Android smartphones.
Even better, there are no limitations whatsoever regarding the video file format or size that you can work on. It guarantees a high-quality output that will play flawlessly on the target screen together with crisp clear audio.
Besides, you have some video editing options to help you cut, merge, and rotate clips not forgetting the nifty feature that lets you limit the output file size. This means that you have reliable video compressor software at your beck and call. Amazingly, this video resolution converter software supports up to 4K Ultra HD quality for videos.
![]()
Steps to change video resolution using Freemake:
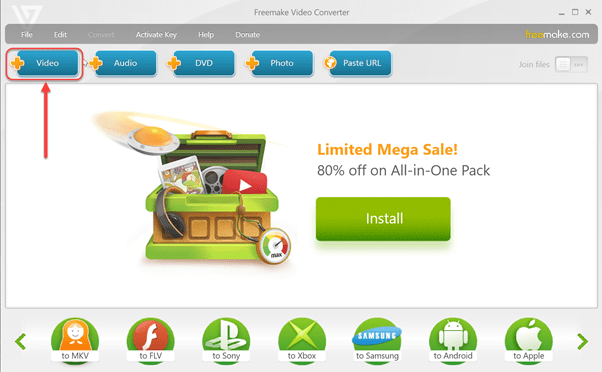
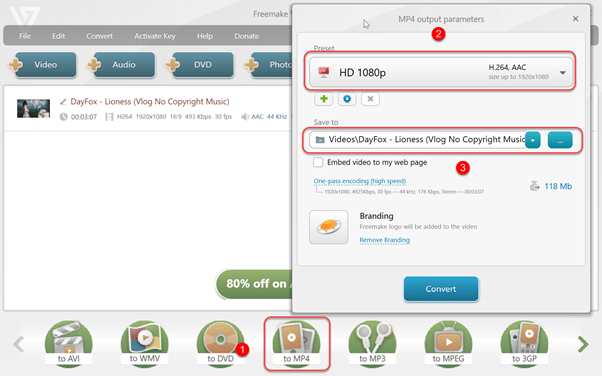
Step 1: Add a video by clicking on the “Video” button at the top of the interface. This will open a file explorer dialog and therefore use it to locate the file you need to adjust the resolution.
Step 2: From the list of output formats at the bottom of the interface, select the one format you prefer, pick your profile of choice under the “Preset” section, and then configure the output directory under the “Save to” section.

Step 3: Customize the preset further. Click on the cog-like icon to open the “Preset editor” window. In the resulting interface, you can pick some build-in resolutions under the “Frame size” drop-down menu or input your won values for the “Width” and “Height”. Hit the “OK” button once you are done.
Step 4: Double-check the adjustments made and complete the process by clicking on the “Convert” button.

5. HandBrake
HandBrake helps you resize almost any video format with support for modern and popular codecs like H.265, H.264, MPEG, Theora, VP8/9, AAC, MP3, A3, Flac, and more. Its most outstanding feature is the comprehensive built-in device presets that are optimized for standard or high video quality adjustment. The good thing is that these presets can be customized too to have your video resolution or aspect ratio with user-specific values.
Also, you are opened up to a live preview feature that comes in handy to check that all adjustments get applied as expected. To help you work on multiple files conveniently, HandBrake offers queueing and batch processing options at your disposal.
You can also change the video resolution, quality, and aspect ratio of DVD and Blu-ray sources as long as they are not copy-protected. If you are looking to enhance the video further, there are a ton of filters to choose from depending on your preference.
![]()
Steps to change video resolution using Handbrake:
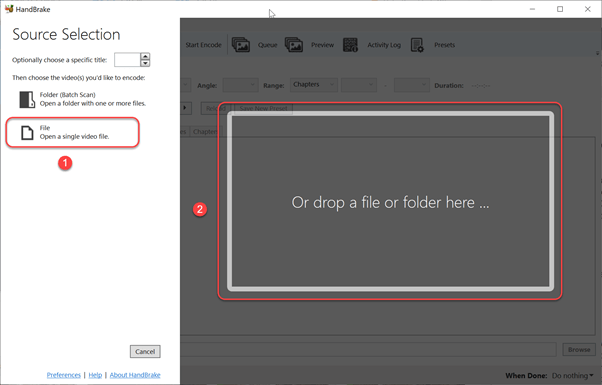
Step 1: Import a video file by clicking on the “File” option or simply drag and drop the file in the indicated area in the middle of the interface.
Step 2: Pick a profile of choice from the “Preset:” drop-down menu after which you need to input the width and height values under the “Size” section to match the video resolution you need.

Step 3: Choose the output format from the “Format:” drop-down menu, set the saving directory and filename in the “Save As:” and then start the conversion process by clicking on the “Start Encode” button.

6. VLC Media Player
VLC Media Player is a free, open-source multimedia app that supports all platforms including Mac and Windows. It is very popular as a fully-fledged media player and goes on to bring you video conversion features as a plus.
VLC supports both software and hardware decoding to deliver an optimum performance based on your computer specifications. You get to change the video quality of almost any video file no matter the source, including DVD media.
Better yet, there are preset profiles at your disposal that go a long way to eliminate some steps for you. VLC supports a rich list of containers and codecs like MPEG, DivX, WMV, AVI, MOV, MP4, MKV, H.264/AVC, FLV, MP3, OGG, not forgetting Blu-rays, DVDs, and CDs. This program provides a very reliable way of changing video resolution and promises quality output for every task you undertake with it.
![]()
Steps to change video resolution using VLC Media Player:
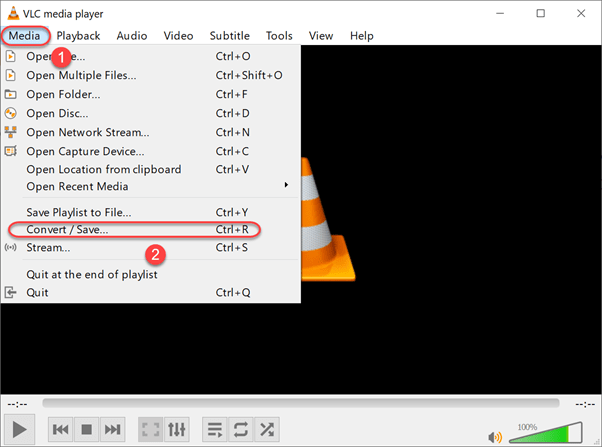
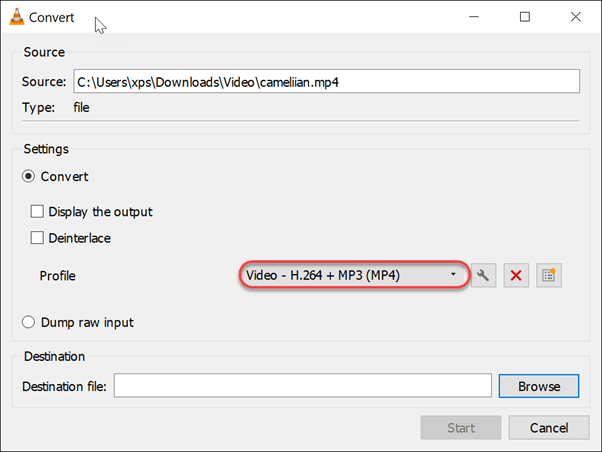
Step1: Open VLC Media Player and from the “Media” menu, select the “Convert/Save…” option.
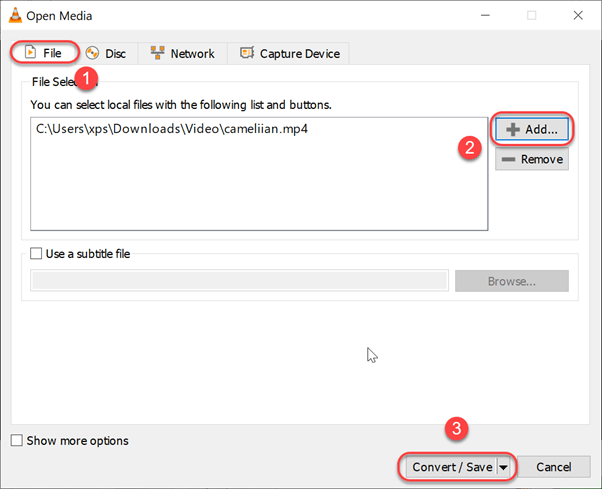
Step 2: From the “Open Media” window, choose the relevant tab depending on the source of the input video file. To add a video from the local storage, click choose the “File” tab, hit the “Add…” to locate the video via the file explorer, and once done, click on the “Convert/Save” button.
Step 3: Choose your preferred output profile from the “Profile” section.
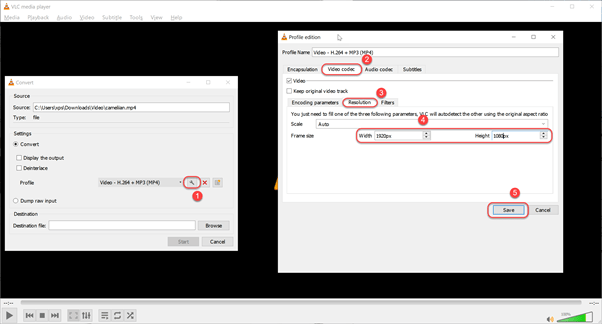
Step 4: To change the video resolution, hit on the spanner-like button shown below to open the “Profile edition” window. From the resulting window, head over to the “Video codec” tab, and under that pick the “Resolution” sub-tab. Input your preferred height and width values for the resolution in the “Frame size” section and then hit the “Save” button.
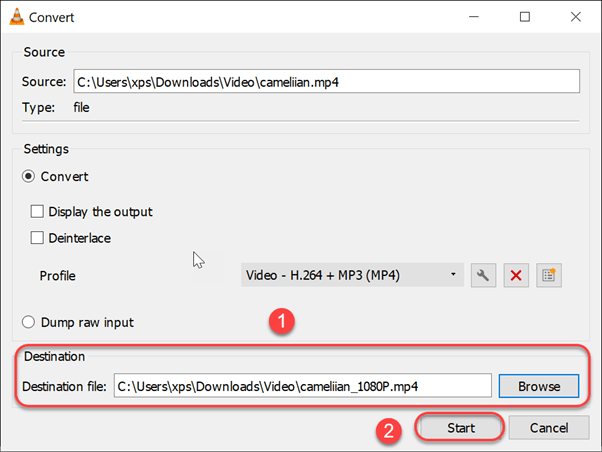
Step 5: Choose your preferred saving directory under the “Destination” section using the “Browse” button and then hit the “Start” button to begin the video resize process.
7. Movavi Video Converter
Movavi Video Converter is a fast video resolution changer with a vast range of video and audio formats. Some of the supported formats include MP4, GIF, AVI, MOV, RAW, WMV, DVD, VOB, MKV, MP3, among others. Besides helping you resize video resolution between native file formats, this software also lets you lower or increase the video resolution to ensure compatibility with all the popular devices.
When faced with multiple videos that require changing the video resolution or aspect ratio, worry not since the batch video processing feature saves you time and effort by letting you convert multiple files simultaneously. Movavi is also an avid video compressor and achieves that while maintaining a high output quality.
Using the built-in video editor, you get the ability to resize and enhance videos to your satisfaction. Reduce the size of huge videos, trim, rotate, add effects, and improve the overall video quality using the amazing Movavi Video Converter on both Windows and Mac.
![]()
Steps to change video resolution using Movavi Video Converter:
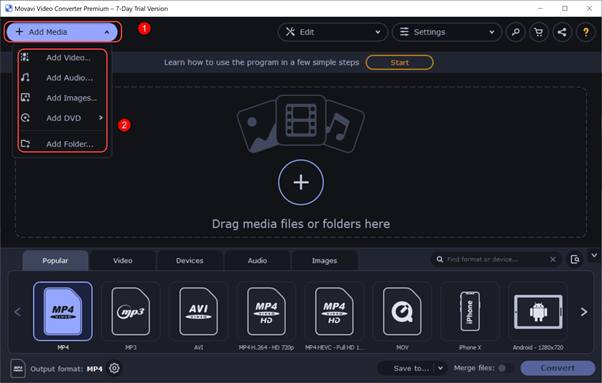
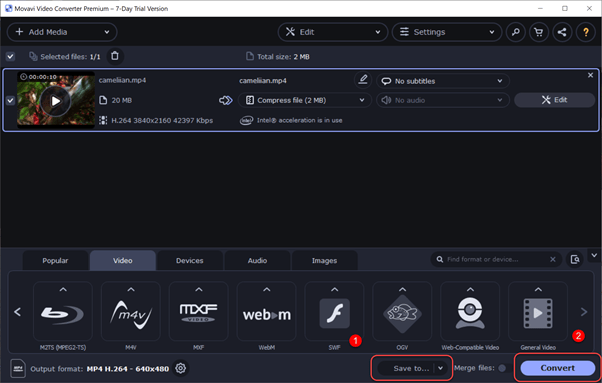
Step 1: Launch Movavi Video Converter and expand the “Add Media” option to reveal the various input sources you can use. Pick the one you prefer and use the native file browser method of adding a file.
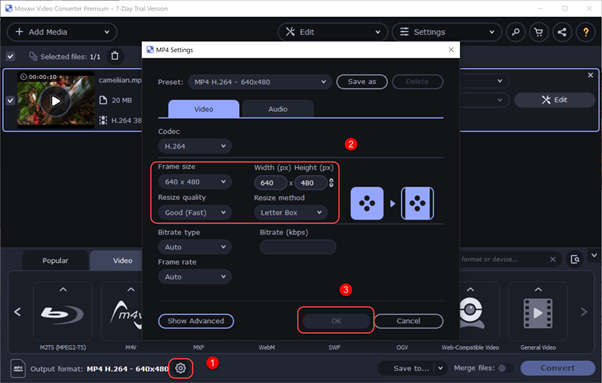
Step 2: Head over to the panel at the bottom and navigate to the “Video” tab. Here, you can choose to work with the available preset profiles by expanding the format to reveal the sub-formats.

Alternatively, click on the cog-like button at the bottom to open the advanced settings. Here, set the “Frame size”, “Width and Height”, “Resize quality”, and “Resize method” before hitting the “OK” button.
Step 3: Use the “Save to…” drop-down menu to set where you need the output saved and then hit the “Convert” button to start the video conversion process.
8. VideoStudio Ultimate
VideoStudio Ultimate is an avid video resolution converter software that boasts of a feature-packed video editor. Using the latest AMD, Nvidia, and Intel hardware acceleration technologies, it can deliver a fast and smooth video quality adjustment process thanks to performance improvement.
Regarding the need to change video resolution, VideoStudio Ultimate offers essential tools to help crop, trim, split, rotate and resize a video with the least amount of effort. In a matter of a few clicks, you can change the aspect ratio of a video and have it the way you prefer. All this is done on the timeline to make the process even more convenient.
Besides, you are provided with templates and presets to choose from and these go a long way to cut down on the steps you have to tinker with. As a result, you get to increase or lower the video resolution no matter the video format.
![]()
Steps to change video resolution using VideoStudio Ultimate:
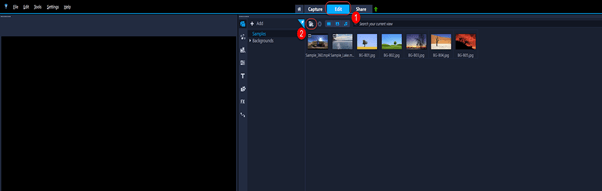
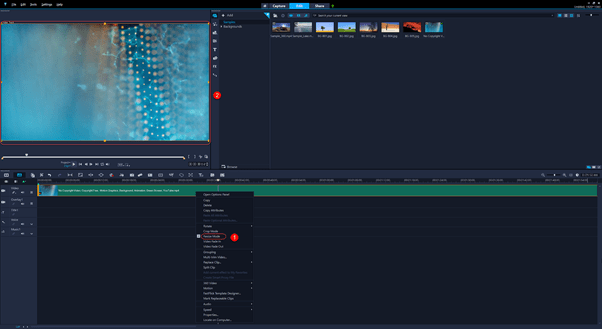
Step 1: Launch VideoStudio Ultimate, switch to the “Edit” mode, click on the “Folder” icon to import a video file to resize.
Step 2: Add the video to the timeline. Just drag and drop the added video into the timeline as shown below.
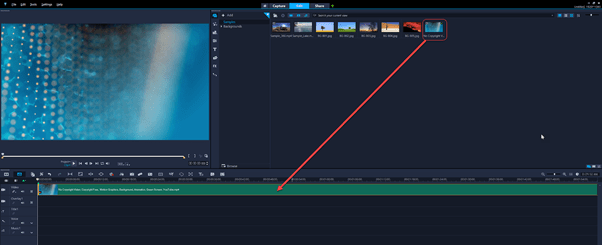
Step 3: From the timeline, right-click on the video and select the “Resize Mode” option. You will notice that the video will get placeholders in the preview window. Move these placeholders to the size you need the video to match.
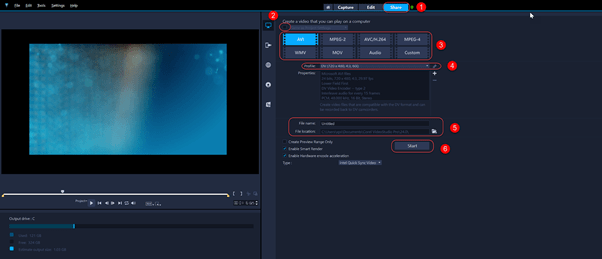
Step 4: To export the resized file, switch to the “Share” tab at the top. Untick the option to export “Same as Project Settings” to get the chance to adjust various parameters like the output format, “Profile:”, “Filename;”, “File location:”, among others. Once you are done with that, click the “Start” button to convert video resolution.
Conclusion
There you have it! A comprehensive lay down of the various software and accompanying methods that you can use to adjust a video resolution and aspect ratio to your preferences. The best thing is that you get to achieve this while keeping the quality intact as much as possible. Grab your preferred video converter app and make the most out of it in regards to adjusting the resolution.